Sun Setting Over the South Rim of the Grand Canyon
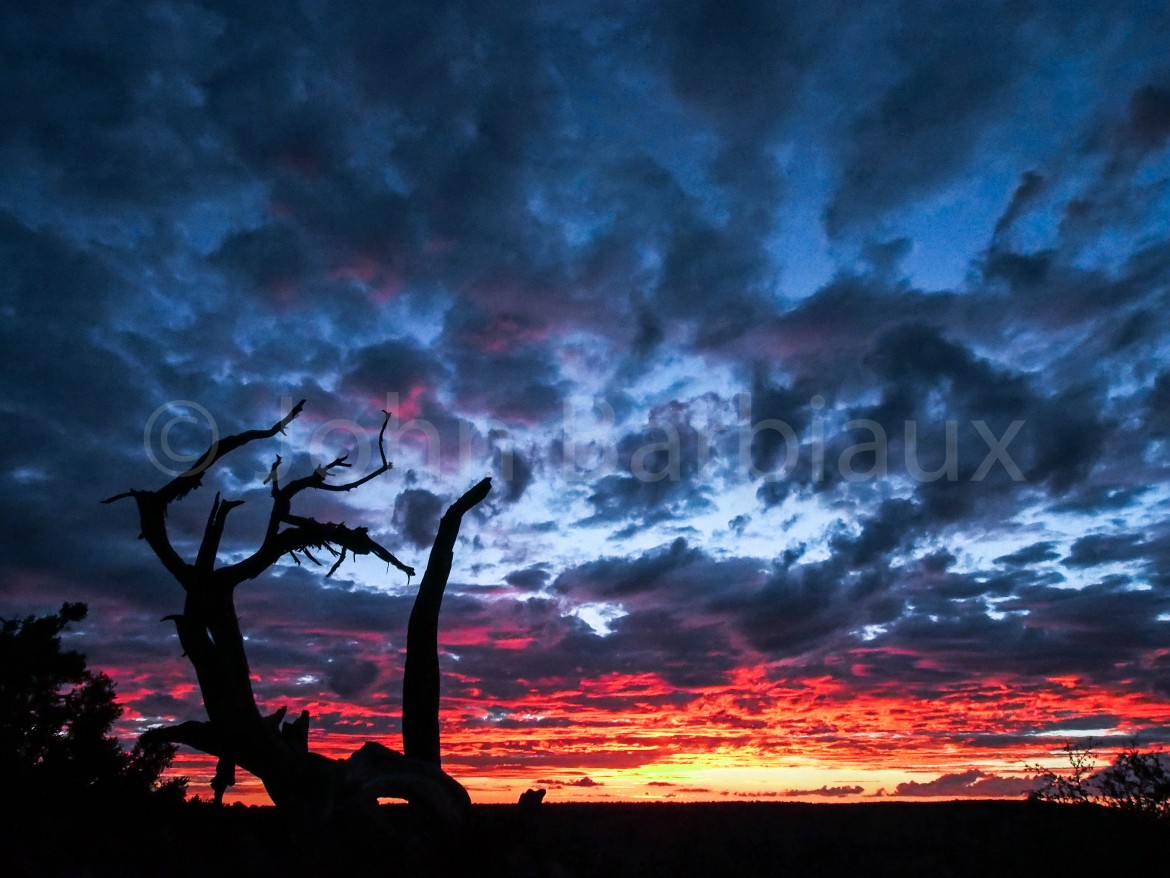
Anyone can point their camera at the sun setting and grab some pretty dramatic photo’s right. What about getting the photograph that really takes your breath away? And what about doing that consistently? It’s actually a lot easier than you think. You don’t need a million dollar camera or a fancy photo processing program. The photo above was beautiful right out of the camera. Here is the trick:
First: Mindset
As soon as you learn that the photograph coming out of your camera is not meant to look exactly like what your eyes see you will begin to excel at photography. I struggled with this one myself. Your eyes are incredibly sophisticated and, as far as I know, impossible to replicate inside of a camera with silicone and lenses. I used to get so frustrated that my sunset pictures never looked exactly like what I saw through my peepers. It was always a beautiful, colorful sky and the foreground would get blacked out or vice versa, right? You’ve all been there. So what do you do? Get creative. Sure, you could take one photo with the sky metered and then one metered on the ground and merge them in Photoshop, and have your cake and eat it too, but I said easily not complicated and time-consuming. There is something supremely satisfying when you understand your cameras limitations and use them to your advantage.
Second: Timing
You’ll get the best sunset picture at around two in the afternoon… Kidding. It’s obvious when you should photograph the sunset right? Well kind of. One of the biggest mistakes you’ll see are people who get to their ideal spot about a half hour before sunset, get all set up for that money shot, then shoot for about 45 minutes until the sun has fallen behind the horizon, and then pack up their gear and head on their merry little ways. When in reality, the best sunset with the most dramatic colors can come well after the sun has fallen behind the horizon. A good rule of thumb is to plan to spend at least an hour photographing the sun setting. Half and hour before the sun sets you can get some great landscape photos and then half hour to 45 minutes after you will get some really great dramatic sky photographs.
Should you wait for a crystal clear sky? No! When there are clouds in the sky (especially after a storm) you will get the most dramatic colors and patterns your little peepers have ever seen. As long as it’s not completely overcast I will go out and shoot the sun set, even if there is only a small break in the clouds. Sunsets and clouds make a great combination.
Third: Composition
Ready, Aim, Photograph! Where do you focus/meter your camera? I’ll give you a hint… it’s in the title of this article. The sunset! Ya, I know… crazy right. Now I’m sure there are a lot of rules when it comes to photographing sunsets but the good news is rules are meant to be broken in photography. Hell, I implore you to break the rules and come up with something truly unique and interesting. If you focus your camera on the ground before you the ground will be exposed but your sky will get over exposed and you will lose all those great colors you see before you. It’s a good idea to put something in the foreground like a tree or a person standing looking out at the sunset to add some substance to the photo. You can see in the photo at the beginning of the article I used the rule of thirds to compose my photo and captured a really cool looking tree on the bottom left of the photograph changing the mood of the photograph. Avoid taking up half the photograph with a blacked out foreground and then half of the sky, try to get the sky to take up 80 or so percent of the photograph… You know… Since your photographing the sunset and all. If you have a DSLR then I would recommend a wide-angle lens, something around 24mm (or 12mm in micro four thirds world).
Fourth: White Balance
This is where your creative freedom shines. Play with it (the white balance that is). Don’t shoot with your white balance on auto, your picture could come out looking completely different from what you anticipated. This isn’t as big of a deal if you shoot in RAW format because you can adjust your white balance in post processing. But I said “easily” take a photograph so I assume your shooting in JPEG format. As always, if you learn your away around your camera and compose the picture correctly on the camera you will need little to no post processing.
Sample:
Here is a photograph of the same sunset where the camera was metered on the foreground instead of the sky (I used a neutral density filter to try to capture some of the dramatic colors of the sky but it did not look as good as when I metered on the sky and let the foreground go black). The tree in the photograph at the top of the page was a bit behind me and to the left in this photo. Everyone has different tastes and this may be your preferred method:
Sun Setting Over the South Rim of the Grand Canyon
Notes:
- You don’t need a tripod to take great sunset pictures if you’re focusing on the sky because you will not have to slow your shutter speed to snail-like paces and if you’re using a wide-angle lens you can slow your shutter speed even more without as much risk of blurring from camera shake. Your mileage may vary depending on the quality of your camera.
- Take your polarized filter off otherwise it could eliminate some of the dramatic colors.
- If your going to focus on the foreground and try to get some of the color in the sky without Photoshopping the hell out of it I’d highly recommend a neutral density filter. You can get the same effect in Lightroom or Photoshop if you’d prefer that but if you get the filter you will save yourself some time.
- Enjoy yourself and don’t forget to put the camera down and live in the moment.


Great post, John, thanks for all the tips!
My pleasure! Thanks for the submissions for the Photo Journal, keep them coming.