
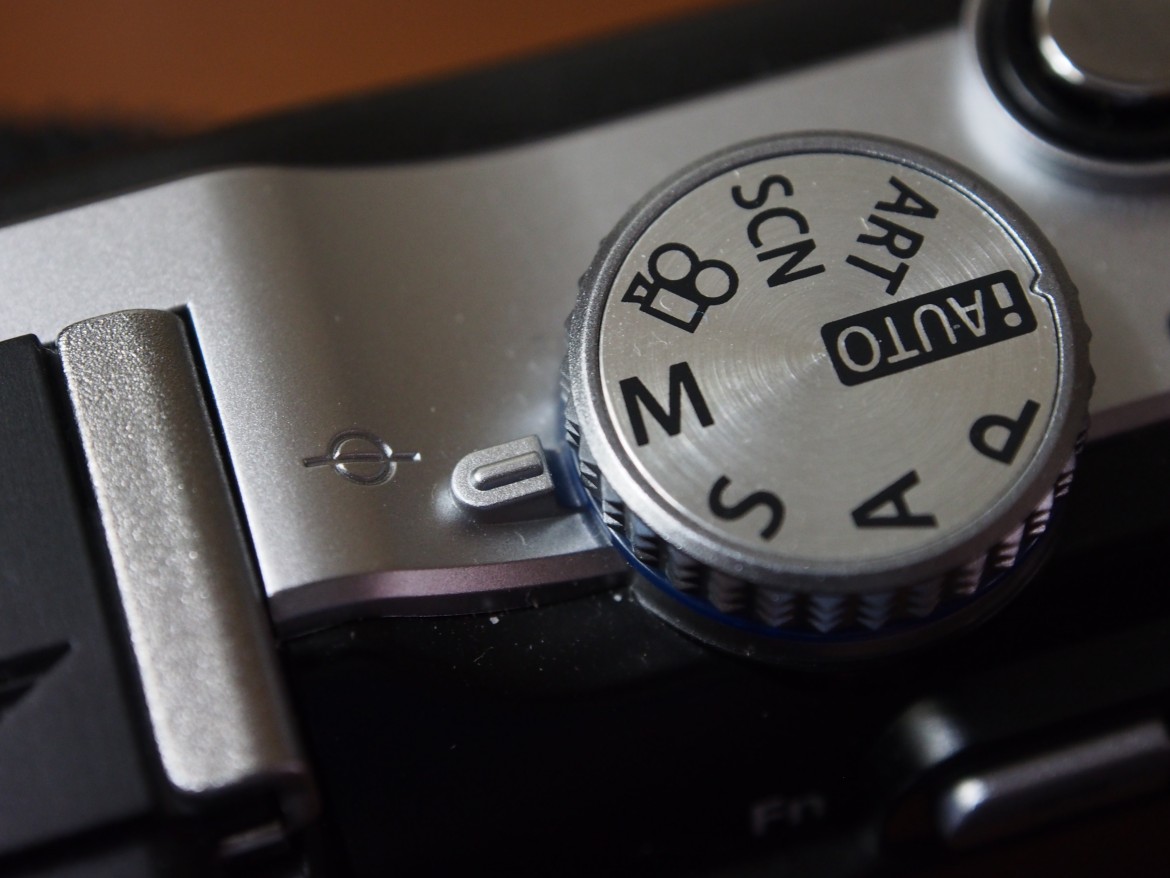

You know how your camera’s function wheel has all those pretty pictures and letters on it but you only use the “auto” mode? I understand, the manual mode sounds pretty daunting. No worries, I’m gonna give you the basics to be up and shooting manually in just a few minutes. So click that tiny wheel to the “M” and lets begin.
There are three settings that are arguably the most important:
- ISO
- Shutter Speed
- Aperture
There are a number of other adjustments that can be made in manual mode (like white balance and highlights) but we will do an article about that down the road. Hold your horses, lets master these three first. So what in the world is ISO?
ISO is the measure of the camera sensors sensitivity to light. Adjust this up, higher number, and the camera is more sensitive to light and your pictures get more noisy (grainy if you will). The lower the ISO number the less sensitive your camera’s sensor is to light and your pictures will be less grainy. The trick is finding a good trade-off. A good time to adjust your ISO is in a dimly lit area where slowing the shutter speed or opening the aperture aren’t an option. Speaking of shutter speed…
Shutter speed is the amount of time your shutter stays open after you trigger your camera. The longer the shutter speed the more light you let in (this is how photographers make those cool photos of traffic with red lines blurring down the highway at night). Shutter speed will shop up on your camera looking like this: 1/30 or 1/500, the higher that bottom number (denominator for you math nuts) the faster your shutter speed and the less light that is allowed into your photo. A good rule of thumb to remember is once you get to around 1/60 your going to need to use a tripod or turn your ISO up so you can speed that shutter speed back up or your image with blur. Take note how your ISO is able to assist you in managing your shutter speed. Using ISO to manage shutter speed comes into play either your aperture will not adjust any further or you would like to keep your aperture right where it is to get the desired field of focus.
Aperture is the diameter of the lens opening when you snap your picture. The wider the aperture the more light you’re allowing into the sensor. Aperture is shown on your camera as an “f” number because it is called an “f stop.” Moving up or down an “f” number doubles or halves the size of the opening (called a stop). Interestingly if you move your aperture down one and your shutter speed up one they will cancel each other out. Moving the shutter speed up or down a stop doubles or halves the amount of light that gets in from one speed to another. Confused yet? Just remember that for every change you make with one you can either compensate with the other or move it even further with the other letting even more or less light in. In another post we talked about how adjusting your aperture can give you depth of field in your photos (making the background of what your focused on either blurry or crisp). The higher your “f” number the crisper your background image will be. Therefore, the lower the “f” number the more out of focus the background will become. Take note that when you want to let more light in your “f” number actually gets smaller not larger (f2 lets more light in than f22). So lets put all this together in an example…
You’re at the pool and you want to get an awesome picture of little Ricky jumping in and splashing that d-bag Jerry that put gum in Ricky’s hair last week. First thing we are going to do is speed up your shutter speed so that we can get a crisp picture of every drop of chlorinated water splashing into that little dickens eyes (the higher your shutter speed the darker the image will get so you may have to adjust your aperture to compensate). So it’s probably sunny out and speeding the shutter speed up did not keep enough light out. Next we need to close the aperture a little to let less light in so the picture isn’t a blown out mess (raise the “f” number), your better than that. You can put the ISO at 250, typically that is the money spot for a crisp clear photo. Now you may want to play with the adjustments and move the aperture or the shutter speed up one and take the same photo and down one for another photo so you can see which one you like better afterwords until you get used to shooting manually.
That is it! Now you can go take photos with your friends and look at them condescendingly when they pull out their thousand dollar camera and shoot in auto mode.

Thank you!