
When you first pull the E-M1 out of the box you’ll want to charge the battery and attach the screen protector (Amazon sells a great one that comes in a two pack for $16, it says for the E-M5 but it fit like a glove on my E-M1). Once the battery is charged up and you’ve attached a lens you’ll want to start with the EVF/LCD settings you’d like. The way the camera comes is the scene will be in your EVF and the LCD will be your Super Control Panel that you can access by pressing the OK button. This is odd because the LCD is able to accept touch input in any other setting so if you’re wondering why the LCD isn’t recognizing your nubs then mystery solved.
(Read below for the HDR instructions… Finally!)
(Want to know what the best lenses are for the EM1? Check out the list here.)


Change LCD View
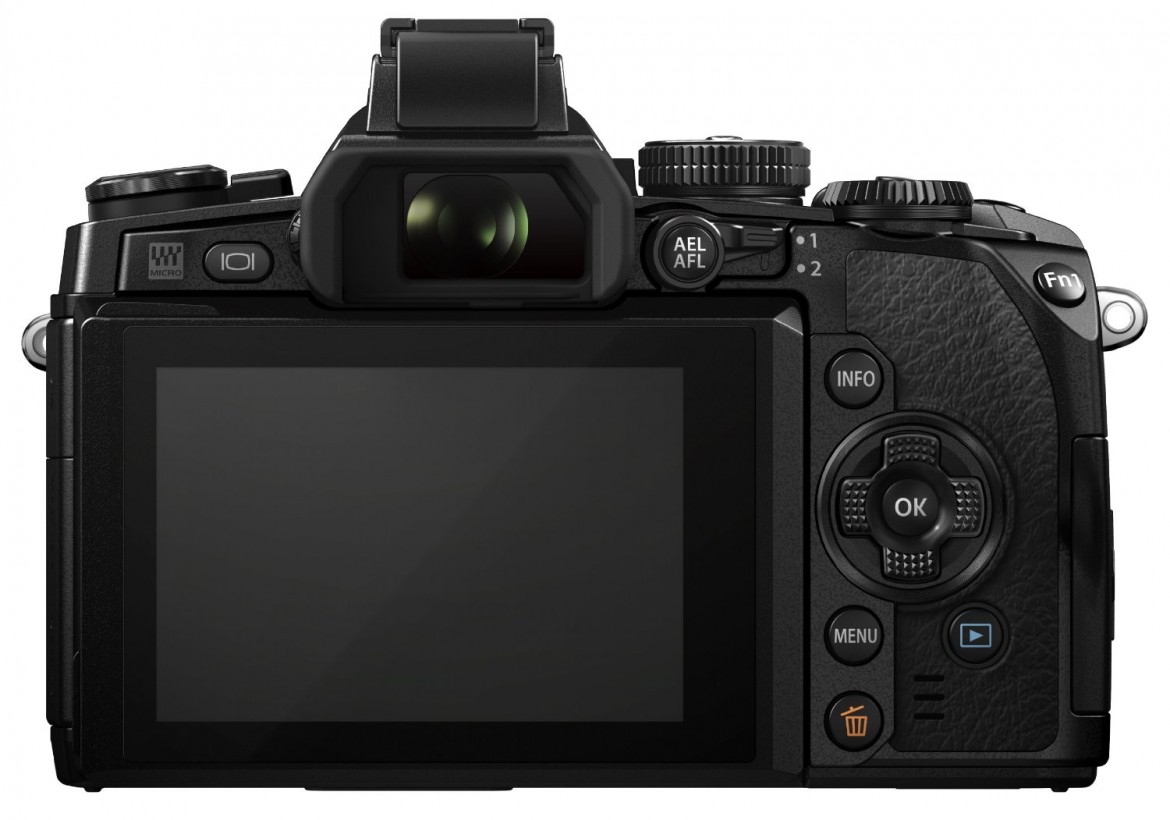
Most people like having their EVF (electronic view finder) and LCD Screen switch back and forth between scene preview depending on where their eye is (if they get close to the viewfinder then the preview switches to the EVF and when they pull away it goes back to the LCD). You can achieve this by pressing the little button to the left of the viewfinder.
Enable Super Control Panel Over LCD Live View
Olympus ships the camera to you set to pull up the Live Control menu when you press the OK button while using Live View. The Live Super Control Panel is much better and puts all the crucial controls right at your finger tips (literally). To enable this option here is what you do:
Menu – Custom Menu – D – Control Settings – Choose the Exposure Mode You’ll Be Using (I choose P/A/S/M) – Press the OK button on the Box Next to Live SCP
Now when you press the OK button while the Live View is on the LCD it will bring up the Super Control Panel (if you left the Live Control menu checked in the settings then it will be the first one that shows up, just press the INFO button and your Super Control Panel should show up.
Turn Off Proximity Sensor
The proximity sensor is what tells the camera to move the Live View from the LCD screen to the EVF when your mug gets close to the viewfinder. This is all well and good until you try to show your friends some of the awesome shots you got and every time you put your potato wedge fingers close to the screen it triggers the sensor and the screen goes dark because it thinks your face is close. Alternatively, if you leave your camera on while strapped around your neck the camera will think your face is close and keep the Live View on in the viewfinder burning up precious battery juice. To turn off the proximity sensor do this:
Press and hold the little button next to the viewfinder – Select Off
Customize The Buttons and Dials
Whenever I use a new camera the first thing I like to do is make it mine by customizing every button and dial to suit my workflow. With the EM1 you’ll quickly realize there are enough programmable buttons in strategic places that you’ll rarely have to dig into the cameras menu.
To change the button designations here is what you’ll do:
Menu – Custom Menu – B – Choose the Button You’d Like to Customize
Once in the you’ve accessed custom menu B you’ll notice about 10 different buttons on the EM1 you can customize as well as what function is currently assigned to them. I can’t tell you how to set yours up (we all like things our own way) but I will say the first thing I did was set the Fn2 button to my ISO selector for ease of use (I’m not a fan of auto ISO).
Customizing the dials works the same way and can be found in the same menu. I like the way the dials are set up as is so I don’t have any recommendations for alternate settings.


as a pl1 user I have a couple of questions regarding video. does the auto grade work in video mode, it does not on the pl1. does the shadow highlight tone adjustment work in video mode
I don’t shoot video but I will look into this… in the meantime, if anyone reading this guide has the answers feel free to reply.
When is the next installment coming. I like this. Thank you for doing this.
I’m working on it, I’m hoping to have some additional info by the weekend. I’m glad you liked it.
HDR is of the most interest for me …
I’d love it if you would explain how to assign all the customizations required for HDR to one of the function buttons…
I’m working on the HDR update and I should have something by the end of next week. Sorry for the delay.
Nice tips, just got my E-M1 two days ago and this guide helped a lot already!
Great! Be sure to check out the photo contest and show off your new photos.
This helped a lot. Thanks! I’m looking forward to reading the HDR guide as well.
Hi John, this is excellent. I’ve just bought the EM1 and it’s my first Olympus having migrated from Nikon and I was finding a tad confusing. I’m big into HDR and really look forward to hearing from you about this. The particular gripe is that while it’s possible to set up a ‘custom’ timer with multiple exposure using auto bracketing it’s not possible to do it from the ‘HDR’ button. This is a pity given the greater range that setting allows. It looks like I either need the remote from Olympus or to get the remote timer working on my phone. The remote from my phone worked briefly for single shots but seems to have bonded with my mac book instead now. I look forward to hearing if you’ve found a solution. I don’t see the point to setting up on a tripod and then pressing the exposure button to get the first shot. I know the people with NEX7 have it even worse in that they have to hold the button down.
Michael,
Thanks, I’m glad you liked it. Could you give me a little more info about the Macbook interfering with your phone as a remote? Did you try having your Macbook forget the OMD before pairing the phone?
Hmm, if that software works it looks like a solution if I can set the timer to take multiple shots. My phone seems to be having a tough time picking up the wifi signal from the camera. I re-installed the app and went through the process again, it worked briefly and then lost contact with the camera. I need to do a bit more research but I’m a bit busy shooting with the camera at the moment. I’d much rather the camera could fire off the timer it’s self in HDR mode, if the phone worked that would be good too. I’m on a Samsung S3.
Hmm, I’m not sure because I’m using an iPhone and I don’t have any issues with staying connected. Perhaps you could borrow a friends iPhone or another Android. I don’t have any friends with Android or I’d check it out myself.
Thanks so much for this guide – great tips! I’ll be returning to this blog more often, it’s really well done. I’m loving my E-M1 so far. I am coming from an E-PL5 for the past year, and was a Canon man before that. It’s so weird that there is so much great stuff turned off by default, or hidden in arcane places in the software. Oh well – at least they make great cameras and lenses! Micro 4/3 for the win!
Thanks! It is crazy that they burry some of the great abilities of the camera deep in the setting. Enjoy and be sure to submit some of your shots to the various challenges we do here on the site through the Submit an Article page.
HDR in the NEAR future ?
Can you be more concise ?
Hey Steve,
Sorry for the delay, I’m a little behind because of the holidays but should have the HDR information posted by this weekend. Thanks.
THANKS FOR THE CHRISTMAS PRESENT !!!!!!! 🙂
I just tried the RF-902 remote available on Amazon with the EM-1 for shooting an HDR sequence and it works fine. This remote allows you to shoot wired or wireless.
i dont understand what you are all talking bout regarding HDR.. If you set the camera to continuous.. and choose bracketing… the way i read the manual, the camera will shoot the bracketed number of shots automatically in a burst consistent with the burst speed. Maybe i am missing something in this conversation ?
I was just mentioning that it’s possible to shoot HDR or any bracketed sequence without touching the camera by using a remote. That insures that there is no movement due to pressing the shutter.
ahh !.. never thought of doing that with my nikon dSlr and my little remote control.. interesting !!
thanks and of course, the best for you, Ed and your loved ones in 2014.. Now get off of the computer and open those presents !!!!!
steve
Thanks for this site. I just bought an E-M1 after being a long time Canon DSLR (20D and 7D) shooter. I ran into the same HDR issue as is being discussed here so this is good info.
Thanks! I appreciate your feedback and I’m glad you found it useful.
Thank you for your great article, I wish you write about multiple exposure settings and problems with it in a future article on the E-M1.
I will add that to my growing list of article ideas, right now I’m working on some articles about various photography technique.
thank you for this amazing article! 🙂
i badly need help on what to enter in the focal length under image stabilization.
i have a 15-50mm. do i enter 15? or 50? i’m confused.
thank u so much 🙂
Got my OMD EM1 on weekend and finding it a little confusing so thankyou for writing such an informative piece 🙂
You are welcome, I’m glad you found it helpful.
hi John.. i want to be able to quickly get into an action mode when needed. Is SPORTS mode good enough, or should i create a my set with better settings ? have you thought about this ?. i would imagine that i’d use continuous, high farme rate.. maybe set at 1/500 sec and auto iso way way up since catching the action is more important than noise control ?. i have no idea how olympus set up their SPORT mode (excepts for continuous shooting of course)
hi,
The rubber near the menu on my Em-1 is starting to peel off. are you having the same issue?
Thanks,
I have not had this issue but I also have not been using the EM1 recently (using the Nikon Df right now). I’d contact Olympus and have them repair it.
Hi John, Thanks heaps for your tips – but am having issues with using the camera in A mode – when I do it selects a very slow shutter speed and this is not helping as when I go over S mode and select a faster shutter speed it chooses a very wide open aperture (2.8) I am in borneo and need speed and depth of field but the “auto” setting seem to be crappy? Is there a way in Say S mode to set the default Aperture to say 5.6? This seems like a real downfall of the camera? I am also using the camera in Auto ISO. Ultimately I would like to use the camera in say S mode, with default Aperature of say 5.6 and it adjusts the ISO. Many thanks Mark
Mark,
I’m glad you found the article helpful. The camera in A mode is going to select a shutter speed based on your choice of aperture… so if you choose an aperture of say 5.6 it will compensate by adjusting the shutter speed automagically. If your ISO is set to auto you may be running into an issue here… It sounds like you’re shooting in low light and your camera may be set to only go up to ISO 1600 or something like that in ISO auto mode. If you wouldn’t mind, try switching to manual ISO and increase your ISO to 3200 and dial in the aperture you want in A mode (aperture priority) and see if that increases your shutter speed. Alternatively, you could put your camera in manual mode and dial in the aperture and shutter speed you want, snap a photograph, if your photo is underexposed then adjust the ISO manually. The auto modes are either going to make your aperture the priority (A mode) or shutter speed (s mode) so you’ll want to use Manual mode if you want control of both. I hope that helps. Let me know if you need further assistance, enjoy!
John. I just discovered your site and I think it’s just great. I’m expecting the UPS dude to show up at my house with my EM1 any minute now and even tho I’m stuck here at work I’m about to wet myself in anticipation. This will be my first “real deal” Olympus camera and I know I’ll get a lot of great use out of it right away, thanks to your great advice!
Thanks for this very helpful user guide. May I add a little quirk I discovered? If you find yourself unable to use the buttons to switch from MF to an AF mode, then you’ve likely slipped the clutched focus ring on the lens to the rear MF position. Simply push the ring forward and the AF mode button on the camera is back in business. I’ve shot Canon gear for years, and Contax before that and never encountered this issue or a clutched focus ring (on the Zuiko 12-40). I like having the option to quickly slip the ring into MF mode – just had to invest an hour in figuring it out!
When my new EM-1 arrived complete with the 12-40mm pro lens, I couldn’t find AF either. Then I asked somebody and they told me about the focus ring “quirk”. Although I’ve used Canon lenses for years, I did once have a Tamron macro lens and I recall this had the same action.
Thanks for the info, John. I would like to start using HDR, but with the lever in the 1 position and the HDR button pressed, turning the front dial does nothing. HDR remains off. What am I doing wrong?
Thanks for the info, John. I would like to start using HDR with my M-1 except with the lever in the 1 position and the HDR button pressed, the front dial doesn’t change anything. HDR remains off and I can’t select HDR1, HDR2, 3F etc. What am I doing wrong?
When I frame my image with my EM-1 either with14-40 or 40-150 mm lens, what I see is NOT what I get. Turns out that what I’m seeing through my viewfinder is just a small portion of the final image, which include a lot more around the frame. I find this very difficult to compose properly. What am I missing?
Hi Rado, i suppose you changed the image format to 16:9 or something. so you see the desired format (which is cropped) in the vf, but if you shoot raw and transfer to lightroom, lightroom ignores the setting and gives you the full, uncropped picture
If you want to show awesome photos and you don’t want to switch off the eye sensor, just turn the monitor a bit off its in-camera position. this shuts down the eye sensor 🙂
Wow… thanks for putting together this post about getting started with the EM-1. I purchased the EM-1 today and your guide was super helpful in helping me get started in figuring out the menu system.
Awesome, so glad it was helpful. Thank you for the feedback.
any updates coming for firmware version 4.0. With so many new features i think its deserves one
I would agree. Unfortunately, there are no plans for an update at this time. I’ve been shooting with the Nikon D810, X100T, and the Nikon Df so I have not kept up with the updates. Such is the downside of being only one person. Though, if you are skilled photographer that knows how to write I am always looking for talent to write for PhotolisticLife… You are welcome to take a crack at writing an update. Either way, thanks for dropping by. Have a great night.
Regarding the proximity sensor – I suggest leaving it on, and to quickly turn it off, tilt the rear screen.